Sometimes you get the Windows error recovery screen when booting up your Windows 7 PC. Now, follow these solutions in this post to fix this issue.
Восстановление Windows 7
Если работа системы не была завершена должным образом (например, для выключения вы использовали кнопку питания), Windows Error Recovery предлагает параметры Safe Mode, Last Known Good Configuration (advanced) или Start Windows Normally.
Предложение, для восстановления ОС Windows, использовать установочный диск или диск восстановления.
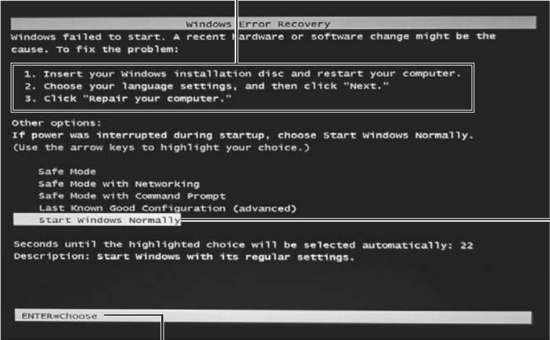
Если файлы восстановления при загрузке в системе недоступны и она не может загрузиться, Windows 7 отображает этот тип сообщения. Для выделения нужного параметра, используйте клавиши стрелка вверх и стрелка вниз.
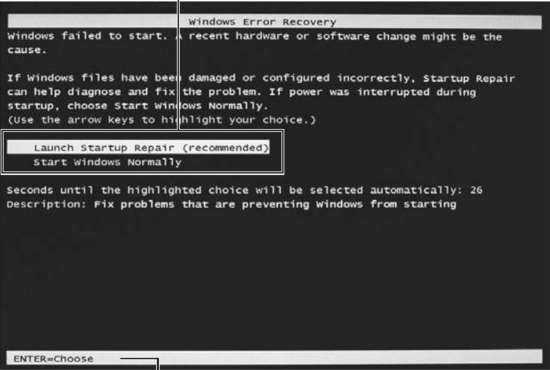
Если файлы Startup Repair доступны в не запускающейся системе, Windows 7 отображает этот тип сообщения. Предложение нажать клавишу Enter для использования выбранной опции запуска. Для выделения нужного параметра, используйте клавиши стрелка вверх и стрелка вниз.
Если вы подозреваете, что Windows работает не так хорошо, как это возможно, но Windows 7 не запускает Windows Error Recovery, вы все равно можете выбрать один из этих и других параметров, нажав при запуске, пока не появится меню расширенных параметров загрузки клавишу F8.
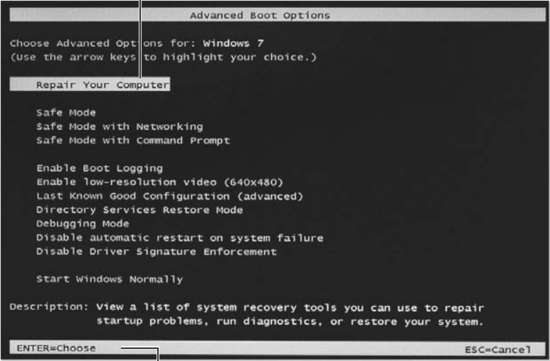
Меню дополнительных вариантов загрузки Windows 7. Предложение нажать клавишу Enter для использования выбранной опции запуска. Для выделения нужного параметра, используйте клавиши стрелка вверх и стрелка вниз.
Источник: http://datbaze.ru/windows/vosstanovlenie-windows-7-posle-sistemnyih-oshibok.html
How to fix Windows error recovery on laptops?
Fix 1: Remove recently added hardware
Adding hardware, for example, a new RAM module can sometimes originate Windows instability problems making your HP laptop to fail to reboot.
Use these steps to rectify whatever issues arose as a result of installing a new hardware:
- Turn off your laptop and remove the AC adapter and its battery.
- Disconnect the newly added device. You may have to reopen the laptop to access whatever hardware you had installed (if it was an internal addition).
- Return the battery.
- Turn on the laptop the usual way.
- The laptop may successfully boot to the desktop and the windows recovery error message will not be redisplayed.
- You can now try to reconnect the device and wait for Windows to recognize it (for an external hardware like a USB webcam).
- For hardware that are installed on the motherboard, the best approach is to ensure that you are installing a compatible device and to introduce the right drivers immediately.
TIP: If you are adding more than one device, it’s advisable to connect one at a time and keep restarting the computer with each addition until you locate the device causing the error. We recommend that you ignore the device generating the error.
- Skip to fix 2 if the error still shows up.
— RELATED: Full Fix: Can’t create Recovery drive on Windows 10, 8,1, 7
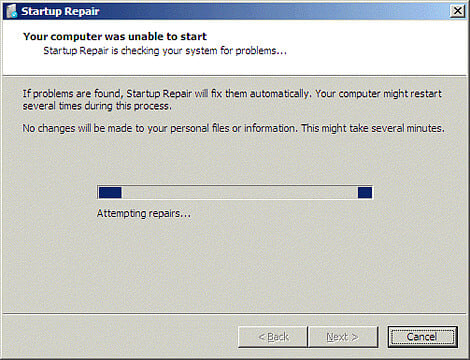
Fix 2: Run Windows Start Repair
You can now attempt to repair a faulty Windows startup process by mending the relevant files.
Steps:
- Let the laptop timer countdown to run to zero once the error message appears or just press enter while the launch start repair option is selected. The startup repair interface opens and starts scanning your HP laptop for problems.
- Implement the suggestions made by the startup repair wizard to rectify the pending faults.
- The laptop should soon restart and boot into your normal desktop.
Otherwise, skip to fix 3 if the error fails to go away.
- ALSO READ: How to fix PC error code 601 in HP Laptops
Fix 3: Boot into LKGC (Last Known Good Configuration)
Booting into the last known good configuration is easy and could solve the problem without much fuss. Steps:
- Restart your laptop.
- Press F8 repeatedly until the advanced boot options appear.
- Choose LKGC (last known good configuration -advanced) then press enter.
- Proceed to Fix 4 if the Windows error recovery still persists.
Fix 4: Restore Your HP Laptop with System Restore
Run a System Scan to discover potential errors

Click Start Scan to find Windows issues.

Click Repair All to fix issues with Patented Technologies.
Run a PC Scan with Restoro Repair Tool to find errors causing security problems and slowdowns. After the scan is complete, the repair process will replace damaged files with fresh Windows files and components.
Restoring the laptop takes it back to the settings that previously worked. You can execute the system restore directly from the startup repair window if that option pops us. Here is how to initialize restore if the option wasn’t provided:
- Turn off the laptop.
- Turn the machine on (press its power button). Now, start pressing the F8 key as soon as the HP logo appears. Press the said key repeatedly until a startup screen appears.
- Highlight the safe mode option using the up/down arrow keys and press enter.
- Select an administrator user account when the windows login screen displays and enter your password (if any).
- When the desktop appears, press the windows button on the menu then click inside the search bar.
- Type cmd then press Enter.
- At the command prompt window, type rstrui then again press enter. The restore System screen opens.
- Click next then choose the last restore point that worked (from the displayed options) then click next.
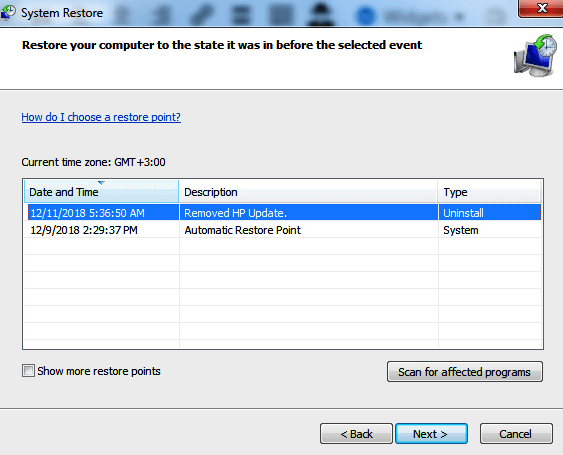
- Now click finish then wait for the checkup and restarting process to complete. Again be patient.
- Hopefully, the laptop boots ok and the error disappear.
- Proceed to Fix 6 if no success.
— RELATED: Full Fix: Driver Stopped Responding and has Recovered in Windows 10
Fix 5: Recover the Laptop

Recovering a HP laptop is equivalent to resetting the computer its factory configuration.
Steps:
- Turn off the laptop.
- Turn it on and press the F11 key repeatedly until the Recovery Manager (Windows 7) opens.
- For Windows 10, it’s until the choose an option window is displayed.
- In Windows 8, it’s until choose your keyboard layout window opens (The laptop restarts).
- Here are the next steps:
- Windows 10
- Click troubleshoot under the choose an option tab
- Click recovery manager on the Troubleshoot tab.
- Click system recovery under help to finally progress to recovery.
- Windows 8
- Click troubleshoot under the choose an option tab.

- Click recovery manager on the troubleshoot window.
- Select Windows 8 to open the all-important recovery manager.
- Now click system recovery for the laptop to be reset to its original factory setup. Another option would be to click the minimized image recovery in order to restore only your windows 8 operating system, drivers, and select software.
- Windows 7
- Click system recovery under the I need help immediately tab.
- Select your preferred backup option when the system recovery asks for your back up preferences.
- Click OK when and if a warning displays.
- Click finish (or continue if its Windows 10/8) to reboot the laptop as soon as the recovery is complete.
- Now go over the typical windows setup until the laptop finishes the fresh reconfiguration.
- Again restart your computer to ensure everything sails smooth.
- You may have to reinstall some or all of your previous software including the antiviruses and business programs (if any) plus any backup files.
- ALSO READ: Fix HP Accelerometer error in Windows 10 with these quick solutions
Using HP Recovery disc to run the recovery
Your HP recovery discs (if you already have them) can also be handy.
Steps:
- Turn on the laptop and then insert your first HP recovery CD/DVD into the drive.
- Turn off the computer.
- Now turn it on.
- Press the escape key continuously until a window’s startup menu or the select boot device window opens.
- If you get the select boot device menu, click the correct CD/DVD drive then press enter.
- Else press F9 to access the boot menu/ device option then choose the right CD/DVD drive and press enter.
- If the window requesting you to run recovery from the hard disk appears, choose the “Run program from disc” option and click next.
- Select “Recovery discs created from your computer”/ “Recovery discs received from HP support” option appropriately.
- Select factory reset/ reset the computer by erasing the entire drive and restoring to the factory setup depending on what’s shown on the screen.
- Select a suitable backup option or otherwise.
- Click OK to hide the warning that appears.
- Follow the steps responding where necessary. Also, insert the next recovery disc when prompted.
- Click finish/next as prompted when the recovery ends.
- The laptop may turn off or restart automatically. If it turned off, wait about 5 seconds before turning it back on.
TIP: The process sometimes takes as long as an hour so practice patience.
- You may have to reinstall some or all of your previous software including the antiviruses and business programs (if any) plus any backup files.
Boot from USB recovery drive
Laptops without a DVD drive will need you to use your HP recovery USB drive.
Steps:
- Turn on the laptop and insert the recovery USB flash disk into the USB port.
- Now turn off the laptop.
- Turn it back on.
- Press the ESC key continuously until a window’s startup menu or the select boot device window opens.
- The selections you need to make vary slightly depending on the type of menu that displays on your screen:
- For select boot device menu, select the correct USB storage drive then press Enter.
- For the startup menu, press F9 to access the boot menu/ device option. Again select the right USB storage drive and press enter.
- The rest of the steps are as I explained above for CD/DVD.
- Remember to remove the USB drive before restarting the laptop.
— RELATED: 5 best software to recover damaged Windows hard drive
Fix 6: Perform Startup Repair with a Windows installation disc
All your methods may fail if there is a critical error with your Windows installation. In such an instance, you need to repair the original windows installation using the disk
Start your computer and insert a working Windows disc into the DVD drive.
- Restart the computer and press F9 (repeatedly) as soon as the HP logo appears until you see the message “Press any key to boot from CD or DVD …”on the screen.
- Select your preferred language, time plus currency, and a favored keyboard/input method, and then click next.
- Choose repair your computer.
- In the next system recovery options window, choose the drive where your Windows installation is and click next.
- Click startup repair in the next dialog.
- Select system restore and follow the steps until the computer is repaired.
Fix 7: Reinstall Windows
Reinstall a fresh copy of Windows if everything else fails.
MORE RESOURCES:
- USB not working on HP Envy laptops? Here’s how to fix this issue
- FIX: HP laptop is not connecting to Wi-Fi in Windows 10
- HP Envy Laptop Battery Not Charging After Windows 10 Installation
 Still having issues? Fix them with this tool:
 - Download this PC Repair Tool rated Great on TrustPilot.com (download starts on this page).
- Click Start Scan to find Windows issues that could be causing PC problems.
- Click Repair All to fix issues with Patented Technologies (Exclusive Discount for our readers).
Restoro has been downloaded by 0 readers this month.
Источник: http://windowsreport.com/windows-error-recovery/
Set Up Did Not Find Any Hard Disk Drives During Installation?
Set up did not find any hard disk drives during installation?
Источник: http://games-on-pc.ru/info/cannot-find-xeldz-in-all-drives/
Четвертый способ: запуск chkdsk
- Вставляем съемный носитель с Windows в разъем (дисковод).
- При выводе на экран надписи «Press any key to boot from CD or DVD», нажмите произвольную клавишу.

- После прогрузки меню, набираем сочетание клавиш <Shift+F10>, увидите надписи в окне.

- В появившемся окошке напишите команду:
chkdsk C: /f /x /r

- Далее — Enter.
- Дождитесь окончания проверки, перезагрузите ПК.
Источник: http://neopod.ru/article/windows-error-recovery-windows-failed-to-start-fix-for-windows-vista-7-8-8-1